7 Tips to Install Preppy Wallpaper Like a Pro
Wallpapers have the incredible power to transform any room, infusing it with personality, color, and style. If you’re a fan of preppy aesthetics, you’ll fall in love with the timeless charm and playful patterns that preppy wallpapers offer. The prospect of installing wallpaper might seem a bit daunting, but fear not! With the right approach and proper preparation, you can achieve results that look as if a seasoned pro handled the task. These seven tips will guide you through the process of installing preppy wallpaper like a pro, ensuring a stunning and long-lasting result.
Choosing the Right Preppy Wallpaper for Rooms
To ensure a beautifully designed room, it’s crucial to carefully select the right preppy wallpaper before installation. To achieve that chic and vibrant look, consider these key factors. Opt for classic patterns like stripes, plaids, or chevrons in bright, cheerful colors, and even pastels or navy blues. Ensure the chosen pattern complements your room’s theme and furniture. Test samples in various lighting conditions to avoid any surprises. Keep the design simple to avoid overwhelming the space. Lastly, prioritize high-quality materials for durability. With a well-chosen preppy wallpaper, your room can become a charming, timeless haven that perfectly reflects your personality with flair and finesse. Let’s get installing!

Get Your Space Ready
The installation process starts with preparing the space for the wallpaper. That means removing any existing wallpaper and giving the walls a thorough cleaning. Take the time to patch up any holes or imperfections, ensuring your walls are smooth and ready to go. If your walls have a glossy finish, consider lightly sanding them to create a better surface for the wallpaper to adhere to.

Equip Yourself with the Right Tools
Having the right tools and materials at your disposal will make the wallpaper installation process much more manageable. Here’s a handy checklist of what you’ll need:
- Your chosen preppy wallpaper
- Measuring tape
- Wallpaper paste or adhesive
- Wallpaper brush or roller
- Utility knife or wallpaper cutter
- Sponge and clean water
- Level or plumb line
- Step ladder
- Double-check that you have everything you need before you begin, as having to stop midway to fetch missing items can be frustrating.

Measure Twice, Cut Once
Accurate measurements are absolutely critical when installing wallpaper. Measure the height of your walls from floor to ceiling and add a few extra inches to the length to account for any uneven edges or corners. If your preppy wallpaper boasts a pattern, take extra care to ensure proper alignment while cutting each strip.
Using a straightedge and a sharp utility knife or wallpaper cutter, make precise cuts. If you have a self-healing cutting mat, use it to protect your floor or table surface and keep your tools in tip-top shape.

Start with a Straight Line
For a truly professional-looking wallpaper installation, you need to establish a straight starting line. Use a level or plumb line to draw a vertical straight line on the wall where you’ll begin installing the wallpaper. This line will serve as your guiding light, ensuring your first strip aligns perfectly.
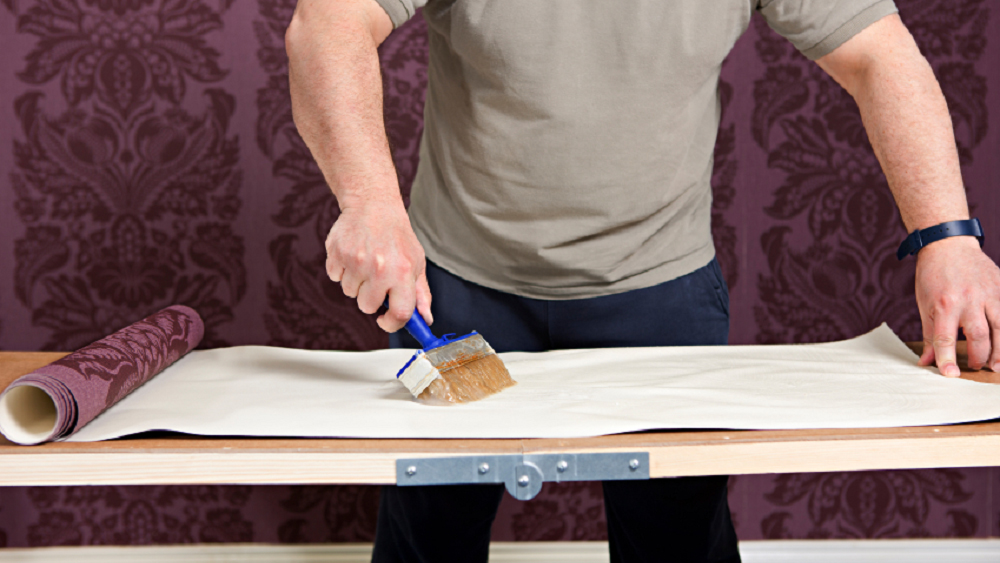
Apply Adhesive with Care
Different preppy wallpapers may require different types of adhesives. Read the manufacturer’s instructions closely to determine whether you should apply adhesive directly to the wallpaper or the wall itself. For pre-pasted wallpapers, activate the adhesive by following the instructions.
For non-pasted wallpapers, use a roller or brush to apply the adhesive evenly to the back of the wallpaper, making sure to cover the edges thoroughly. Avoid applying excessive adhesive that might seep through the paper and cause unsightly stains.
:strip_icc()/how-to-hang-peel-and-stick-wallpaper-01-ac2a8e797bcf4629b37b8b3eb852abe7.jpg)
Smooth Out Air Bubbles and Wrinkles
As you hang each strip of preppy wallpaper, use a wallpaper brush or roller to smooth it out and eliminate any air bubbles or wrinkles. Start from the center of the strip and work your way out towards the edges. This technique will help you achieve a seamless finish that looks flawless.
If you encounter stubborn bubbles or wrinkles, gently lift the wallpaper and reposition it. Just be careful not to stretch or tear the wallpaper while doing so.
:strip_icc()/103258777-7a636e75df7947768058602c3c24eacf.jpg)
Trim with Precision
After successfully installing each strip, it’s time to trim any excess wallpaper at the top and bottom using a sharp utility knife or wallpaper cutter. Employing a straightedge will ensure clean and precise cuts.
As you go along, remember to wipe off any excess adhesive with a damp sponge to keep the surface clean and free from residue.
Conclusion
With these seven tips, you’re well on your way to installing preppy wallpaper like a pro. Remember that patience and attention to detail are key to achieving stunning results. Take your time to measure, cut, and align each strip accurately, and you’ll be rewarded with a beautifully decorated space that exudes the charm and elegance of preppy style. Happy decorating!”


One Comment